Multistage pipeline
This is an example or best practice of automated strategy leading your application through all stages of onboarding — dev, QA, staging, production
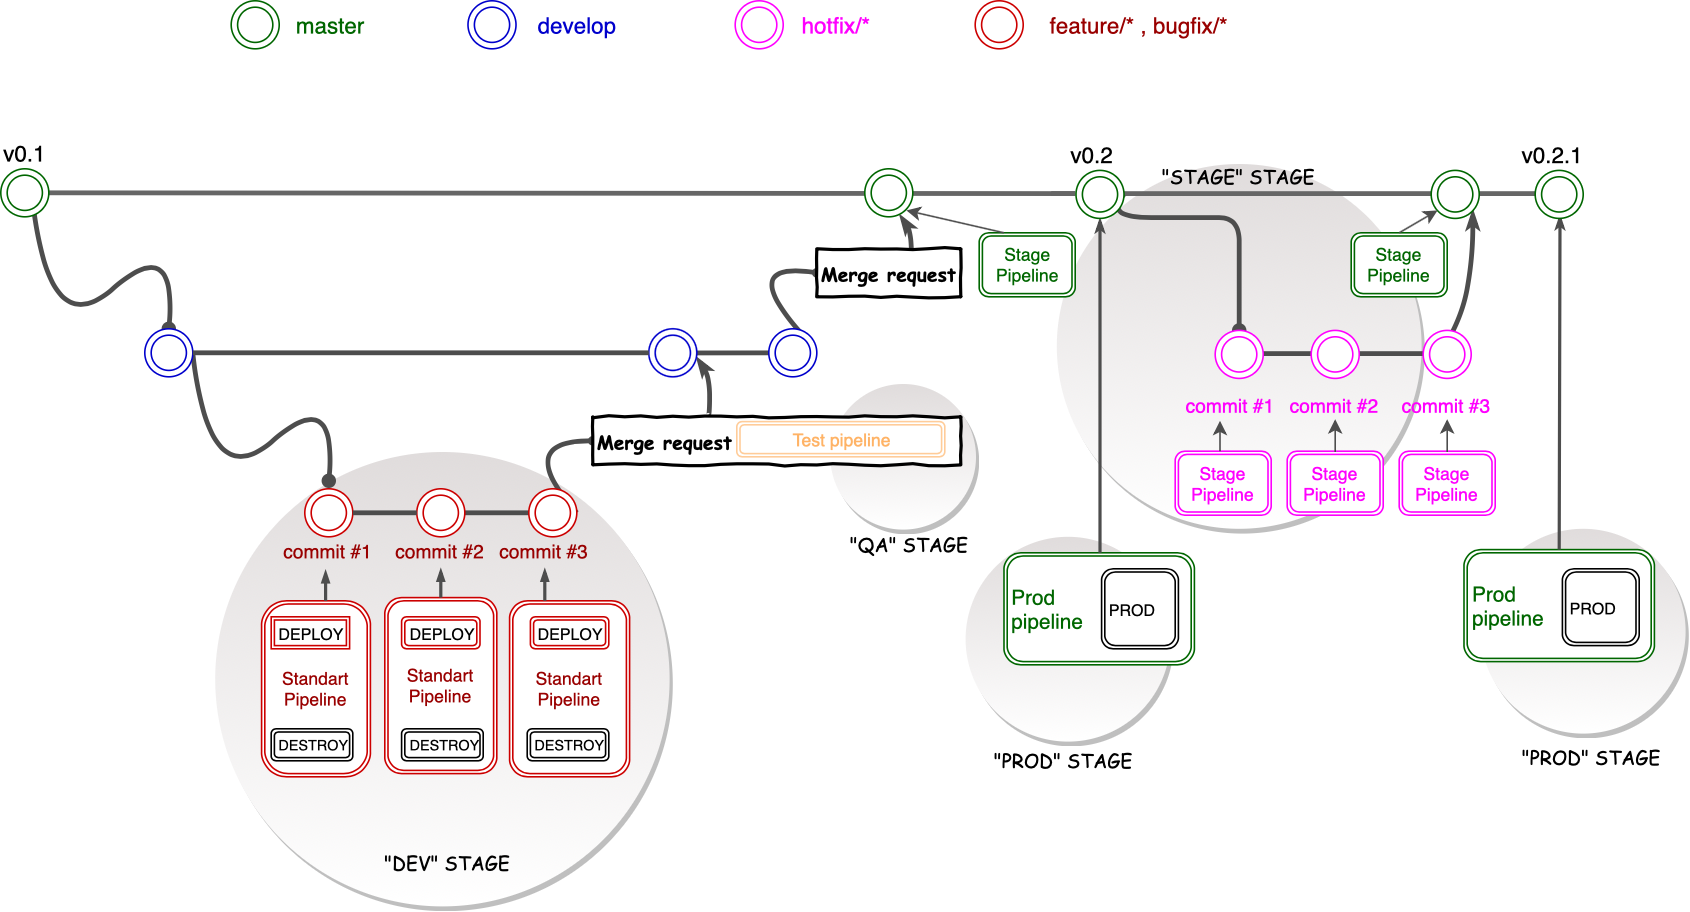
Branches
main branch
The main branch has to be consistent with the current state in production. Once the tag from the master branch will be created it triggers a pipeline creation, which contains manual production steps.
The main branch always stays in a working state and only completed items get added once ready. This will allow you to keep a working copy of the app at all times (or as close to as possible) for testing or analysis.
Think of it this way: the main branch is what you’d release today if you had to. As soon as you tag a commit with release 1.0 (which ius the state of the main branch at that point in time), the main branch becomes the branch working towards your next release. The tag 1.0 sits back there in your history as a reminder of what you released, and possibly a branch point for bugfixes. If you’re lucky, all it ever is - is a reference.
Common names for this branch include: master (GitLab) or main (Github)
develop branch
The develop branch is created from the main branch for development tasks. Users can create branches from develop with prefix bugfix/{name} and feature/{name}. Each merge request into the develop branch starts a new pipeline with tests.
Common names for these branches include: develop, development or dev
feature and bugfix branches
Branches for development tasks. feature/* branches are created from the develop branch for a short period of time when part of the team is working on a specific feature. It helps to parallel tasks between team members, so they can work on several features at the same time and not block or affect each other. Once the development in the feature branch is finished it can be merged back to the Development branch for end-to-end testing.
Common names for these branches include: feature/* or bugfix/*
hotfix branch
Branches for preparing hotfixes into production created from the main branch can be named as hotfix/*. Each commit from this branch will trigger a new pipeline. The pipeline will contain only one step which starts deploying the procedure to the stage environment.
Common names for these branches include: hotfix/*
Stages
Pipeline stages can be divided into 4 stages:
Stage 1 - DEV
Any user with at least "Developer" GitLab role can create feature and bugfix branches from the develop branch.
These branches are intended only for development tasks.
For a running pipeline targeting a specific environment, you will have to specify the target environment where the pipeline runs.
This can be done, for example, by specifying a new CI/CD variable where the value is datacenter/tenant_name ( example - ic-hrvart2/test-application).
Stage 2 - QA
After Stage 1 it is time to make sure that any change has not broken any logic. All changes from feature and bugfix branches have to be merged into the develop branch through a Merge Request. Once you create a Merge Request tests start.
If all tests are passed you can should request a peer review and then merge changes into the develop branch - and further create a merge request to the main branch. ⚠️ Merge to main branch is allowed only from hotfix or develop branches.
Stage 3 - STAGING
Each commit to the main branch (merge from develop or hotfix) will trigger a new pipeline to the staging environment. Commit to hotfix branches will trigger staging pipeline as well. The target environment for staging is described in .gitlab-ci file.
Stage 4 - PROD
If the user’s code passed "QA" (2) and "STAGING" (3) stages, there is a high likelihood that new functionality did not affect other features and can be deployed to production without major problems. If you feel that it is time to start the deploy procedure to production then navigate to the tags field in GitLab and create a new appropriate tag from the main branch: a pipeline for deployment to production will be automatically created - when continuous development is not in place, a manual jog trigger will be used.
For specifying more than one prod environment you should add an additional step into gitlab-ci file for each new environment (if you wish to template and reuse these jobs, you can use YAML anchors).
Gitlab CI file
Example of prod stage definition in .gitlab-ci file:
prod_name:                                <-- SPECIFY NAME OF PROD ENVIRONMENT HERE
  stage: prod                             <-- SIGN THAT IT IS PROD STAGE
  only:
    - tags
  except:
    - branches
  tags:
    - <runner tag>                        <-- SPECIFY TAG OF THE RUNNER YOU WANT THE DEPLOYMENT PROCESS SHOULD RUN
  variables:
    TARGET_ENVIRONMENT: $PROD_ENVIRONMENT <-- SPECIFY TARGET ENVIRONMENT HERE
  script:
    - source openrc.sh
    - <trigger for deployment>            <-- SPECIFY COMMANDS WHICH TRIGGER INFRA DEPLOYMENT AND APP IMPLEMENTATION
  environment:
    name: $TARGET_ENVIRONMENT
  artifacts:
    name: $CI_COMMIT_REF_SLUG
    paths:
      - <artifacts>                        <-- SPECIFY PATH OF ARTIFACT(S) IF NEEDED
  allow_failure: false
  when: manual
The codeblock above can be extended for other stages (e.g. stage or test environments) by using
stage: test
or
stage: staging
in the .gitlab-ci file.
In case artifacts are resulted from the pipeline, they can be directly downloaded from GitLab once the pipeline finished successfully.
All environments for stages are specified in variables section in .gitlab-ci file. Do not use them as value of your environment for development goals. Example:
variables:
  PROD_ENVIRONMENT: ic-hrvart1/vnf-ghost-test
  STAGE_ENVIRONMENT: ic-hrvart1/vnf-ghost-test2
  TEST_ENVIRONMENT: ic-hrvart2/vnf-ghost-test3